Wednesday, October 30, 2013

RECIPE: My Favorite Caramel Apple Pie

Click to Enlarge Photo!

Peggy's Favorite Caramel Apple Pie

Ingredients

1 double pie crust

1 stick unsalted butter
3 tablespoons all-purpose flour
¼ cup water
½ cup granulated sugar
½ cup packed brown sugar

8 tart baking apples, cored and sliced
2 tablespoon lemon juice
½ teaspoon cinnamon
Click to Enlarge Photo!

Directions

Preheat oven to 450 degrees. 

Peel, core, and slice apples. Toss in a big glass bowl with lemon juice and cinnamon. 

Melt the butter in a saucepan. Stir in flour and mix well. Add water and both sugars. Bring to a boil and then reduce heat to medium, watching closely for “caramel” to turn amber.

Pour ½ of caramel over apples and stir well. 

Fill pie crust with apple mixture.

Cover with top crust made into a tight (close-knit) lattice pattern.

Carefully pour remaining caramel over the lattice work into the pie.

Bake for 15 minutes and then reduce oven to 375 degrees. Continue baking for another 30 to 45 minutes, until apples are soft and crust begins to nicely brown.


Cool completely and serve with homemade "no churn" vanilla ice cream.  (Recipe can be found in my “Notes” on Facebook here.)

Click to Enlarge Photo!


Online Cake Decorating Class

Tuesday, October 29, 2013

RECIPE: My Favorite Carrot Cake (feat. Cream Cheese Icing and Pecans)

This cake is decadent and so easy to make! I can make this recipe and have a perfectly finished cake and a spotless kitchen in 90 minutes flat! Feel free to substitute walnuts for pecans, either is excellent. (Hint: If you have trouble translating the measurements, a quick Google search is all it takes to translate cups or sticks into grams, etc.)
Cake Ingredients
4 eggs
2 cups granulated sugar
1 1/4 cups vegetable oil
2 tsp pure vanilla extract
2 cups all-purpose flour
2 tsp baking powder
2 tsp baking soda
2 tsp ground cinnamon
1/2 tsp salt
3 cups grated carrots (see note 1)
1 cup chopped pecans or walnuts
NOTE 1: I cheat and buy the baby carrots already peeled and just run them through the grater on my food processor. It takes about 3 minutes and it rinses clean in a snap!
Icing Ingredients
3/4 cup butter, softened (1.5 sticks)
12 ounces cream cheese, softened
6 cups confectioners sugar
1.5 tsp pure vanilla extract
1.5 cups chopped pecans or walnuts
Cake Directions
1. Preheat oven to 350 degrees, prepare 2 8” round pans (grease and flour well).
2. In mixer bowl, add eggs and mix slightly. Add sugar, oil, and vanilla.  Mix well.

3. Add in flour, baking powder, baking soda, cinnamon, and salt. Mix well.
4. Fold in carrots.
5. Fold in pecans.
6. Pour into prepared pans and bake approximately 55 minutes. (See note 2.)
7. Cool cakes completely before assembly/icing. (See note 3.)
NOTE 2: My ovens over the years have varied greatly on this baking time. Cakes are ready before they look ready – but not until an inserted toothpick comes out clean. Watch them closely the first time you try this. I’ve used ovens that baked this cake in 50 minutes and ovens where it took well over an hour.
NOTE 3: Flip pans upside down while catching cake – just to loosen the cake from the pan. Then sit the pans back down with the cakes still inside them. Leave the cakes in the pans for at least 10 minutes so they’ll hold their shape. After 10 minutes is up, flip cakes out and finish cooling on wire rack.
Icing Directions
1. In mixer bowl, cream butter.
2. Add cream cheese, mix well.
3. Add confectioners sugar, mix well.
4. Add vanilla, mix well
5. Fold in chopped nuts.
Assembly Directions
1. Tort COMPLETELY COOLED cakes so you end up with 4 layers of 1” cake (or thereabouts).
2. Cover each layer generously with icing and stack. It’s nice if the icing oozes out the sides. :)
3. Cover the top with an illicit amount of icing.
4. Decorate with a few whole nuts.
If there are any leftovers, I refrigerate in a TRULY airtight container after the second day – and that ensures cake will stay fresh not dry out. Putting any cake in a fridge will dehydrate the cake if it’s not in an airtight container.


Saturday, October 19, 2013

Dawn Butler: Cake Airbrush Artist (with Special Thanks)!

Photo courtesy of Dawn Butler
I want to extend a giant, heartfelt thanks to Dawn Butler of Dinkydoodle Designs by Dawn Butler (pictured to the left) for generously sponsoring more than $1,600 worth of prizes in the Peggy Does Cake 75K giveaway earlier this month. If you don’t know Dawn, she’s more than just a benevolent prize donor! 


Photo courtesy of Dawn Butler
She’s also a talented cake designer, airbrush instructor, and author! She's been traveling the globe doing classes and impressively has a tutorial featured in the Fall Edition of Cake Masters Magazine!  Check out the free 'sneak peek' of that tutorial (and more!) in the magazine's fall issue HERE.

Photo Courtesy of Cake Masters Magazine, with permission

If you didn't win an airbrush in my giveaway and you want one as desperately as I do, just send Dawn a quick message and she can definitely hook you up with some state-of-the-art equipment! Her custom systems are more affordable than you think; in fact, I was actually quite shocked at just how affordable.  This is on my Christmas wish list for sure, and since I've hardly been bad at all this year, I have my hopes up.

Photo courtesy of Dawn Butler


Thanks Dawn, for making this milestone so meaningful and fun - not just for me, but for my followers, and especially for my winners!


Wednesday, October 9, 2013

Peggy Does Cake 90K Giveway: Craftsy Class of your Choice!

Cake Decorating Class of Your Choice From Peggy Does Cake and Craftsy!


To celebrate 90,000 Facebook likes, Peggy Does Cake has teamed up with Craftsy to offer the chance to win a Craftsy class of your choice! Simply register by clicking HERE. If you are already a Craftsy member, use the same link and simply login with your username and password. You will then be entered in the contest automatically!

I approached Craftsy because they are one of my favorite ever 'go to' help sites for my cake decorating obsession.... er hobby! I’ve gotten the BEST on-line classes from them (see a review of some of my favorites HERE), but even when I'm not in the market for a new class, I still obsess over their FREE blog which is full of clever articles ranging from fondant tutorials to cake recipes to general baking and decorating advice.

Best part: I love that you own your classes for life, and you can stop and start on a whim. I often take days to watch a class, and rewind and fast forward a dozen times. But that's why they fit my crazy, busy life!  

Craftsy registration is free and just for the wonderful free blog articles alone, it's  worth a sign up. It's definitely one of my online 'happy places'!

If you've been wanting to try a class, here's a great opportunity to get yours FREE! If you're still reading and haven't entered yet to win, just click HERE to do it now.

Contest runs for two weeks and ends on Wednesday, October 23rd. Craftsy will pick the winner and I'll make the announcement here and on my Facebook page soon after! 

Good luck everyone! 

Wednesday, October 2, 2013

Peggy Does Cake FB 75,000 Giveaway!


Recognize what's in this photo?  It's a 'state of the art' airbrush gift set for making custom cakes.  And it can be YOURS.  In fact, it can be yours and yours and yours - because I'm giving away THREE of them.

To celebrate 75K followers, I’m partnering with Dawn Butler of Dinkydoodle Designs by Dawn Butler to give away three (3) awesome airbrush gift packages to three (3) lucky winners!

To enter, click HERE or visit Peggy Does Cake on Facebook HERE and use the big blue “Giveaway” icon at the top of page.

Giveaway begins at 12:01 A.M. on Sunday, October 6th (stay up until midnight Saturday night and then enter when the clock strikes 12, woo!) and it’s open through midnight Saturday, October 12th (Central Time).

Our three (3) lucky winners will be chosen randomly via Rafflecopter and will be notified via email.


Click my flyer to see a bigger version and check out the prize packages in better detail:

Thank you to the incredibly generous Dawn Butler for making this giveaway a reality!


Tuesday, October 1, 2013

World Vegetarian Day: Peggy Does Vegetable Garden Strata

Peggy Does Veggies!

October 1st is "World Vegetarian Day" - and since my 15 year old daughter has been a vegetarian since she was 12, we do a LOT of vegetables in this house!

I'm not much of a cooker, but if it goes in the oven... I'm down with it. I won't be straying from cakes very often on this blog, but I'm excited to share one of my all-time favorite recipes in the universe with you: Summer Garden Strata. 


If you're looking for a fantastically delicious way to use up summer garden vegetables, look no further. THIS. RECIPE. IS. GOOD. 

We ate this stuff all summer long, over and over, until we ran out of vegetables. When our garden got sad and gave up the ghost, we made it with store-bought veggies! It's SO delicious - and if you love it the day you make it, buckle up for the leftovers, which are incredible.

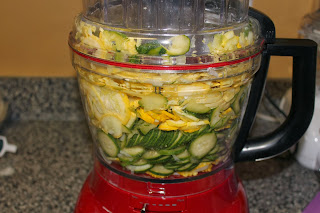
This recipe is a family favorite, and I've been making it for years; but because you need to do a little work to slice everything super thin and then remove the excess water from both the squash and tomatoes, I've always found it a bit cumbersome...  until recently! Instead of using my mandoline (which, don't get me wrong, I love), I now use my KitchenAid© food processor to do all the slicing. Miraculously, a once intimidating recipe is now a breeze. And what once took ages to make, can now be done much more rapidly. But with or without the 'best' tools, this recipe is amazingly worth the effort!

Vegetable Garden Strata

Ingredients
  
Strata:
1 T extra virgin olive oil
4 large onions, sliced thin pole to pole
5 zucchini, sliced thin
4 summer squash, sliced thin
8 tomatoes, sliced thin and salted

Baste:
3 T extra virgin olive oil (more if needed)
Garlic, 2 cloves fresh or 4 T pre-chopped
Fresh thyme, 8 sprigs (or 1 T dry)
Salt to taste
Cracked Pepper to taste

Topping:
2 ounces Parmesan cheese, grated
2 medium shallots, finely minced
2 slices white bread, processed (about 1 cup) (or ½ cup bread crumbs)
1 T extra virgin olive oil

Finish:
Fresh basil, about a dozen leaves (or a sprinkling of dry)

Method

1.      Baste a 9 x 13 casserole dish with extra virgin olive oil or non-stick spray.  Set aside for later.

2.    Peel onion and cut in half, then slice thin from pole to pole. I used my KitchenAid© food processor for this (which took about 8 seconds), but you can use a mandoline or a knife for this part.

3.    Heat 1 T extra virgin olive oil in a large skillet. When hot, add onions and turn heat down to medium-low. Cook slowly, allowing onions to caramelize. Baking has taught me patience for things like caramelizing onions. Never rush this part! Here mine are just going in. How bad do you think I need new pots and pans?


4.    While the onions are cooking, scrub squash and slice thin. I've done this step by hand in the past, but I don't advise it, unless you can get a zillion 1/8" even slices. Not only is it cumbersome, but it's hard to get uniformity. A mandoline works fine here, but the tender little squash from my garden fit PERFECTLY into the round feeder of my KitchenAid© food processor.


 5.    Toss squash with about a teaspoon of salt, and allow to drain until they render about ¼ cup or more of water. This could take an hour or so. The MAIN trick to perfecting this recipe is to get rid of the excess water in the vegetables. So it’s important to salt the squash and tomatoes and let them sit; this will force them to release water. This will yield a finished strata that’s dense and not swimming in watery juice.


6.    While squash are draining, scrub and slice tomatoes. Lay the tomatoes out on a clean towel or paper towels and sprinkle with just enough salt to generously cover them. Allow tomatoes to ‘drain’ while squash is draining.


7.    Check your onions. Add a dash of salt and a sprig or 2 of thyme (or a dash if you're using dry thyme). Keep cooking slowly, working towards a nice golden brown. And yeah, caramelizing onions with thyme? Oh man, the entire house is smelling GOOD at this point!


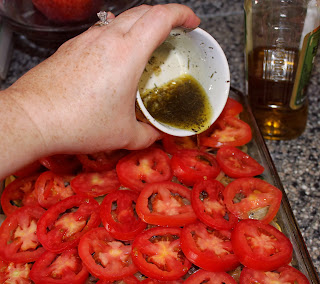
8.    While the onions are cooking and the veggies are draining, prepare your baste. Mix about 3 T olive oil, thyme scraped from stem (or about 1 T dry), and garlic into a small dish. Salt and pepper to taste, but I use about ¼ tsp salt and probably ½ tsp or more of pepper. Stir well. This will be thick and extremely fragrant.


9.    When your squash has rendered about ¼ to ½ cup of liquid, blot it dry with a paper towel or clean kitchen towel. I have been known to wring it tight. At the same time, blot the top of the tomatoes, too. Press down gently and try to get all the liquid off them. You want all your veggies nice and dry.


10.Toss about 1 T of basting mixture into squash and mix well. Remember that casserole dish we prepared earlier? Fill that baby up with the seasoned squash!


11.  The onions are perfectly done by now. Throw them on top.


12.Cover the onions with neatly lined tomato slices.

13.Spoon, brush, or pour basting mixture onto tomatoes. I try to cover every single one with a little, so no one gets lonely. 


14.Bake in 425 oven for about 40 minutes, until vegetables are fully cooked and tender. Dish will begin to brown a bit. Here it is almost done. When you finally remove it, turn oven up to 450.


15.While strata is baking, process shallots. Remove from processor and give a quick wipe with a paper towel to dry. Process bread slices. Mix well in a separate bowl: bread crumbs, shallots, Parmesan, and 1 T extra virgin olive oil. Don’t process the topping or it gets gummy. Sprinkle topping over baked strata and return to 450 degree oven.


16.Bake another 10 minutes or so, until Parmesan begins to bubble and form a crust. Remove from oven and cover with fresh, torn basil leaves immediatelyLet sit to cool slightly before serving.

    
It's not cake, but it's unbelievably delicious! I hope you give it a shot. 
If you do, I'd love to hear some feedback!


Related Posts Plugin for WordPress, Blogger...