Peggy Does Veggies!
October 1st is "World Vegetarian Day" - and since my 15 year old daughter has been a vegetarian since she was 12, we do a LOT of vegetables in this house!
I'm not much of a cooker, but if it goes in the oven... I'm down with it. I won't be straying from cakes very often on this blog, but I'm excited to share one of my all-time favorite recipes in the universe with you: Summer Garden Strata.
If you're looking for a fantastically delicious way to use up summer garden vegetables, look no further. THIS. RECIPE. IS. GOOD.
We ate this stuff all summer long, over and over, until we ran out of vegetables. When our garden got sad and gave up the ghost, we made it with store-bought veggies! It's SO delicious - and if you love it the day you make it, buckle up for the leftovers, which are incredible.
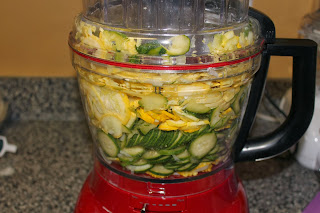
 This recipe is a family favorite, and I've been making it for years; but because you need to do a little work to slice everything super thin and then remove the excess water from both the squash and tomatoes, I've always found it a bit cumbersome... until recently! Instead of using my mandoline (which, don't get me wrong, I love), I now use my KitchenAid© food processor to do all the slicing. Miraculously, a once intimidating recipe is now a breeze. And what once took ages to make, can now be done much more rapidly. But with or without the 'best' tools, this recipe is amazingly worth the effort!
Ingredients
Strata:
1 T extra virgin olive oil
4 large onions, sliced thin pole to pole
4 large onions, sliced thin pole to pole
5 zucchini, sliced thin
4
summer squash, sliced thin
8
tomatoes, sliced thin and salted
Baste:
Salt to taste
Cracked Pepper to taste
Topping:
2 ounces Parmesan cheese, grated
3 T extra virgin olive oil (more if needed)
Garlic, 2 cloves fresh or 4 T pre-chopped
Fresh thyme, 8 sprigs (or 1 T dry)Garlic, 2 cloves fresh or 4 T pre-chopped
Salt to taste
Cracked Pepper to taste
Topping:
2 ounces Parmesan cheese, grated
2 medium shallots, finely minced
2 slices white bread, processed (about 1 cup) (or ½ cup bread crumbs)
1 T extra virgin olive oil
Finish:
Fresh basil, about a dozen leaves (or a sprinkling of dry)
1 T extra virgin olive oil
Finish:
Fresh basil, about a dozen leaves (or a sprinkling of dry)
Method
1.
Baste
a 9 x 13 casserole dish with extra virgin olive oil or non-stick spray. Set aside for later.
2.
Peel
onion and cut in half, then slice thin from pole to pole. I used my KitchenAid© food processor for this (which took about 8 seconds), but you can use a mandoline or a knife for this part.
3.
Heat
1 T extra virgin olive oil in a large skillet. When hot, add onions and turn heat down to
medium-low. Cook slowly, allowing onions to caramelize. Baking has taught me patience for things like caramelizing onions.
4.
While the onions are cooking, scrub squash and slice thin. I've done this step by hand in the past, but I don't advise it, unless you can get a zillion 1/8" even slices. Not only is it cumbersome, but it's hard to get uniformity. A mandoline works fine here, but the tender little squash from my garden fit PERFECTLY into the round feeder of my KitchenAid© food processor.
5. Toss squash with about a teaspoon of salt, and allow to drain until they render about ¼ cup or more of water. This could take an hour or so. The MAIN trick to perfecting this recipe is to get rid of the excess water in the vegetables. So it’s important to salt the squash and tomatoes and let them sit; this will force them to release water. This will yield a finished strata that’s dense and not swimming in watery juice.
5. Toss squash with about a teaspoon of salt, and allow to drain until they render about ¼ cup or more of water. This could take an hour or so. The MAIN trick to perfecting this recipe is to get rid of the excess water in the vegetables. So it’s important to salt the squash and tomatoes and let them sit; this will force them to release water. This will yield a finished strata that’s dense and not swimming in watery juice.
6. While squash are draining, scrub and slice tomatoes. Lay the tomatoes out on a clean towel or paper towels and sprinkle with just enough salt to generously cover them. Allow tomatoes to ‘drain’ while squash is draining.
7.
Check
your onions. Add a dash of salt and a sprig or 2 of thyme (or a dash if you're using dry thyme). Keep cooking slowly, working towards a nice golden brown. And yeah, caramelizing onions with thyme? Oh man, the entire house is smelling GOOD at this point!
8. While the onions are cooking and the veggies are draining, prepare your baste. Mix about 3 T olive oil, thyme scraped from stem (or about 1 T dry), and garlic into a small dish. Salt and pepper to taste, but I use about ¼ tsp salt and probably ½ tsp or more of pepper. Stir well. This will be thick and extremely fragrant.
8. While the onions are cooking and the veggies are draining, prepare your baste. Mix about 3 T olive oil, thyme scraped from stem (or about 1 T dry), and garlic into a small dish. Salt and pepper to taste, but I use about ¼ tsp salt and probably ½ tsp or more of pepper. Stir well. This will be thick and extremely fragrant.
9.
When
your squash has rendered about ¼ to ½ cup of liquid, blot it dry with a paper
towel or clean kitchen towel. I have
been known to wring it tight. At the
same time, blot the top of the tomatoes, too. Press down gently and try to get all the liquid off them. You want all your veggies nice and dry.
10.Toss about 1 T of basting mixture into squash and mix well. Remember that casserole dish we prepared earlier? Fill that baby up with the seasoned squash!
10.Toss about 1 T of basting mixture into squash and mix well. Remember that casserole dish we prepared earlier? Fill that baby up with the seasoned squash!
12.Cover the onions with neatly lined tomato
slices.
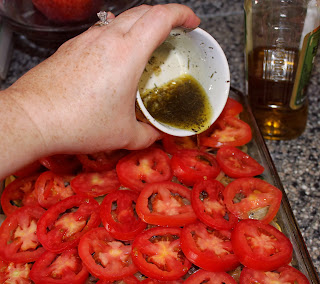
13.Spoon, brush, or pour basting
mixture onto tomatoes. I try to cover
every single one with a little, so no one gets lonely.
14.Bake in 425 oven for about 40
minutes, until vegetables are fully cooked and tender. Dish will begin to brown a bit. Here it is almost done. When you finally remove it, turn oven up to 450.


This comment has been removed by a blog administrator.
ReplyDeleteThis comment has been removed by a blog administrator.
ReplyDelete